This tutorial, like some others around here, uses GIMP to make images. I know there are some of you that cringe when you hear that program name, but in all reality GIMP is
the best free image manipulation software that is out there. The quality can't be found anywhere else, except in programs such as Adobe Photoshop CS3 and a few others, all of which you pretty much have to pay to use. So like I said, unless GIMP screwed your brother out of a job or something, try and put those angry thoughts past you and give GIMP another try, eh?
Lesson One: AvatarsAvatars are the most demanded images on ComNet right now. Just about everyone wants them, problem is not everyone knows how to make them or nobody wants to spend the time figuring it out on their own. In this tutorial I hope to help you out with making your own avvie magic.
1) If you don't have GIMP, then get it. Link is here:
GIMP DOWNLOAD2) If you don't have the layer effect, "Script-fu", then you might want it. Link is here: http://registry.gimp.org/files/layerfx.scm
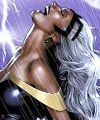
NOTE: If you get the Script-Fu Layer Effect, make sure you save it in your Scripts file in GIMP on your computer. Then you'll have to close out of GIMP and reopen it again to use Script-fu.3) Pick an image. This is the easiest part. When picking an image, it is important to visualize how that image will look as a smaller, condensed avatar. Also make sure that your image has decent quality, stand-alone. One less thing you have to worry about. Today I'll be using Storm from X-men.

4) Clean it up. Use the Van Gogh filter set on 1 or 2, then sharpen it up again (sharpness, about 35 or so depending on preference)
FILTERS>ARTISTIC>VAN GOGH
FILTERS>ENHANCE>SHARPEN
So far:

Better, right? Even if you don't think so (or if you just don't see the changes) don't worry about it. The bottom one is brighter, clearer, and prettier than the first.
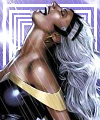
5) Crop it. Using your TOOLBOX select the Rectangle Select Tool all the way at the top left hand corner. Use that tool to crop your picture, and once you do that go into Image and then Crop to Selection.
TOOLBOX>RECTANGLE SELECT
IMAGE>CROP TO SELECTION
So far:

There. Pity that we had to cut some of it, but that's the way it works. How much you want to crop is up to you; I like busts (head and neck) but some people prefer full body pictures. Again, up to you.
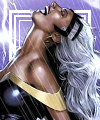
6) Scale it. Easiest part of the whole thing. Go to Image, then select Scale Image, and make it 100 width by 120 hight. (if the chain image to the right of them is not broken, you may have to click on it to change each dimension seperately.)
So far:
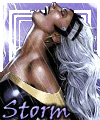
7) Add a boarder. There is an actual filter for that, but I like to use my own methods. Usually I go to File and make a new project that has 100x120 dimensions with a transparant background, then I crop the inside of the image so that there is a 10x10 strip around the edge. Then I use FILTER>DECOR>ADD BEVEL to give the boarder a 3D look. Then just copy and paste it onto the origional picture.
However, with this particular picture I don't think a boarder would be prudent. Her nose goes pretty much to the top and would be cut off. So, I'll use a few tricks with transparancy. Just use the crop tricks I showed you on a much smaller level.
So far:
or
That's it. Personally I like the second one better. Adding text is a whole other tutorial in and of itself.
In the next lesson I'll show you how to get your avatar to look like this:
[This message has been edited by
Ron
(edited April 20, 2009
8:22:18 PM)]
[This message has been edited by
Ron
(edited April 20, 2009
8:57:39 PM)]
[This message has been edited by
Ron
(edited April 20, 2009
8:58:04 PM)]
[This message has been edited by
Ron
(edited April 20, 2009
9:26:21 PM)]